If you have ever experienced the deep, caramelized crunch of a Lotus Biscoff biscuit, you know that No-Bake Biscoff Cheesecake is the ultimate evolution of that flavor. This recipe captures everything we love about the iconic Belgian speculoos cookie—the warm cinnamon notes, the hint of ginger, and that unmistakable “burnt sugar” sweetness—and transforms it into a silky, decadent masterpiece. Whether you are hosting a dinner party or just craving a late-night treat, these mini cheesecakes are the answer.
The beauty of a No-Bake Biscoff Cheesecake lies in its accessibility and its texture. Unlike baked cheesecakes that require water baths and constant monitoring for cracks, this version relies on the perfect ratio of cream cheese to cookie butter to achieve a cloud-like consistency. It is a foolproof way to impress your guests with a professional-looking dessert that looks like it came straight from a high-end bakery window.
In this guide, we are going to walk through every step of creating these stunning individual desserts. From the compressed, dark brown crust to the glossy golden-brown drizzle, we will ensure your final result matches the viral Pinterest aesthetic perfectly. If you love decadent textures, you should also check out our hot fudge brownie cheesecake for your next baking project.
Why This No-Bake Biscoff Cheesecake Is a Game Changer
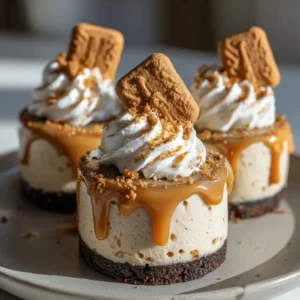
- Incredible Visual Contrast: The dark brown compressed crust against the light beige filling and golden drizzle creates a professional, multi-layered look.
- No Oven Required: Perfect for hot summer days or when your oven is occupied with sweet Hawaiian crockpot chicken.
- Make-Ahead Friendly: These actually taste better after a night in the fridge, making them the ultimate stress-free hosting dessert.
- Texture Heaven: You get the crunch of the biscuit, the silkiness of the cream, and the gooeyness of the melted cookie butter in every single bite.
- Pinterest-Ready Aesthetic: With the whipped cream swirl and biscuit shard, these are designed to be the star of your social media feed.

The Anatomy of the Perfect Speculoos Dessert
To achieve the “Forensic Visual Accuracy” we strive for, we must understand the ingredients. This No-Bake Biscoff Cheesecake isn’t just about mixing things together; it’s about the quality of the components. We use Lotus Biscoff spread—often called “liquid gold” in the culinary world—as the primary flavoring agent in both the filling and the topping.
If you find yourself obsessed with creamy, no-bake textures, our coconut rice pudding offers a similar comfort-food vibe with a tropical twist. But for today, we are focusing on the spiced, cozy flavors of Europe. Let’s look at what you’ll need to get started.
Ingredients for Success: Quality Over Everything
The Compressed Cookie Crust
25-30 Lotus Biscoff Biscuits (approx. 250g): These provide the base flavor. We want a fine crumb to ensure the crust holds together without being too hard to bite through.
6 tbsp (85g) Unsalted Butter: Melted butter acts as the glue. Using unsalted butter allows us to control the saltiness of the base perfectly.
1 tbsp (15ml) Brown Sugar: A tiny addition that helps the crust achieve that dark brown, caramelized look once chilled.
The Silky Cookie Butter Filling
16 oz (450g) Full-Fat Cream Cheese: It must be room temperature! Cold cream cheese leads to lumps, and we want a “light beige” smooth finish.
1 cup (250g) Biscoff Cookie Butter: Use the “smooth” variety for the filling to maintain that elegant mouthfeel.
1 cup (120g) Powdered Sugar: Sifted to ensure no clumps. This provides sweetness and stability to the no-bake structure.
1 tsp (5ml) Vanilla Extract: Enhances the warm spice notes of the cookies.
1.25 cups (300ml) Heavy Whipping Cream: Must be cold. This is folded in to provide the airy, mousse-like volume.
The Iconic Visual Toppings
1/2 cup (125g) Biscoff Cookie Butter: This will be melted for that signature glossy drizzle.
1/2 cup (120ml) Heavy Cream (for whipping): To create the precise white swirls on top.
Extra Biscoff Biscuits: Some for crushing into fine crumbs and some to break into shards for the final “crown.”

Step-By-Step Instructions for the Perfect Mini Cheesecakes
Step 1: Constructing the Compressed Base
Place your Biscoff biscuits in a food processor and pulse until they reach the consistency of wet sand. You want some very fine dust and some tiny granules for the best texture. Transfer the crumbs to a bowl and stir in the melted butter and brown sugar.
Visual Cue: The mixture should look like dark, damp earth. Press about 2 tablespoons into the bottom of each mini cheesecake mold. Use the back of a spoon to press down firmly. This creates the “thick, compressed dark brown Biscoff cookie crust” seen in our visual blueprint.
Step 2: Beating the Cream Cheese Filling
In a large bowl, beat the room-temperature cream cheese until it is completely smooth and fluffy. Add the cookie butter and continue to beat until fully incorporated. The color should transform into a beautiful, light beige.
Sensory Cue: You will smell the cinnamon and nutmeg immediately. Add the powdered sugar and vanilla, mixing on low until combined so the sugar doesn’t fly everywhere. If you love this flavor profile, you might also enjoy our banana pudding frosting on other cakes.
Step 3: Folding for Volume
In a separate chilled bowl, whip your heavy cream until stiff peaks form. Gently—and I mean gently—fold the whipped cream into the Biscoff mixture using a spatula. Do not use a mixer here, or you will deflate the air you just worked so hard to create.
Visual Cue: The result should be a uniform, pale tan color with no white streaks remaining. Pipe or spoon this mixture over your chilled crusts, smoothing the tops with an offset spatula.
Step 4: The Setting Phase
Place your cheesecakes in the refrigerator for at least 6 hours, though overnight is better. This allows the fats in the cream cheese and cookie butter to solidify, creating a clean “snap” when you bite into it. While you wait, you could prep a healthy side like our broccoli salad with bacon for dinner!
Step 5: The Glossy Cookie Butter Drizzle
Once the cheesecakes are set, melt your remaining cookie butter in the microwave for 20-30 seconds until it is pourable but not hot. Spoon it over the top of each cheesecake, allowing it to “spill slightly over the edges” just like in the Midjourney prompt.
Step 6: The Final Artistic Flourish
Whip the remaining cream with a touch of sugar and pipe a “precise swirl of white whipped cream” in the center. Gently press a “small shard of a Lotus Biscoff biscuit” into the cream at an angle. Finally, finish with a “dusting of fine cookie crumbs” for that professional bakery look.
Expert Tips for the Best No-Bake Biscoff Cheesecake
- Room Temperature is Key: Ensure your cream cheese is truly soft. If it’s cold, your filling will have tiny white lumps that ruin the “light beige” aesthetic.
- Don’t Over-Melt: When melting the cookie butter for the drizzle, do it in 10-second bursts. If it gets too hot, it will melt the cheesecake filling underneath.
- Clean Slices: If you are making one large cheesecake instead of minis, dip your knife in hot water and wipe it clean between every single slice.
- Sift Your Sugar: Powdered sugar often has hard lumps. Sifting ensures the filling stays as smooth as silk.
Storage and Freezing Instructions
To Refrigerate: Keep your No-Bake Biscoff Cheesecake in an airtight container for up to 5 days. The crust may soften slightly over time as it absorbs moisture from the filling, but the flavor will remain incredible.
To Freeze: You can freeze these without the whipped cream and biscuit shard. Wrap them tightly in plastic wrap and foil for up to 3 months. Thaw in the refrigerator overnight before adding the fresh toppings.
What to Serve With This
Since this dessert is quite rich and sweet, it pairs beautifully with a tart contrast. A side of fresh raspberries or a drizzle of tart lemon curd can cut through the intensity of the cookie butter. For a full meal plan, consider serving these after a fresh strawberry cheesecake dump cake or a savory meal of roasted chicken.
Frequently Asked Questions
Yes! This recipe fits perfectly into an 8-inch (20cm) springform pan. Simply increase the chilling time to at least 8 hours to ensure the larger surface area sets properly.
We don’t recommend it for no-bake recipes. Full-fat cream cheese provides the necessary structure and fat content to help the cheesecake set without gelatin.
The secret is melting the cookie butter just until it’s fluid (about 20-30 seconds). If it gets too hot, it loses its shine; if it’s too cold, it won’t spill over the edges.
While Biscoff is traditional, you can use any speculoos-style spiced cookie or even graham crackers in a pinch, though the flavor profile will change.
This usually happens if the cream cheese wasn’t full-fat or if the heavy cream wasn’t whipped to stiff peaks before folding. Ensure you don’t over-mix during the folding process.
The Ultimate No-Bake Biscoff Cheesecake Recipe
No-Bake Biscoff Cheesecake: The Ultimate Creamy Cookie Butter Dessert
Ingredients
Equipment
Method
- Pulse 250g of Biscoff biscuits in a food processor until fine crumbs form.
- Stir in melted butter and brown sugar. Press firmly into the bottom of mini cheesecake molds to create a dark brown compressed layer.
- Beat room temperature cream cheese and 250g cookie butter until smooth and light beige.
- Mix in powdered sugar and vanilla extract until fully incorporated.
- Whip 300ml heavy cream to stiff peaks, then gently fold into the Biscoff mixture.
- Pipe filling over the crusts and refrigerate for at least 6 hours.
- Melt remaining cookie butter and spoon over chilled cheesecakes, letting it spill slightly over the edges.
- Top with a whipped cream swirl, a biscuit shard, and a dusting of crumbs.
Notes
Ensure the cream cheese is at room temperature to avoid a lumpy texture.
Join the Bite_Journey Community!
Did you make this No-Bake Biscoff Cheesecake? We want to see your results! This recipe was designed specifically to be the most “pinnable” dessert in your arsenal. Save this recipe to your Dessert Board on Pinterest so you never lose it!
Don’t forget to follow Bite_Journey for more high-RPM recipes and culinary inspiration. If you enjoyed this, please leave a 5-star rating in the recipe card above and upload a photo of your mini cheesecakes in the comments. Seeing your creations is the highlight of our day!