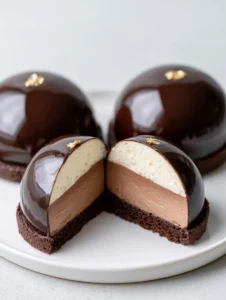
There is nothing quite as breathtaking as a dessert that looks like it belongs in a high-end Parisian patisserie. These Triple Chocolate Mousse Domes are the epitome of chocolate luxury, featuring three distinct layers of airy mousse encased in a reflective, dark chocolate mirror glaze. If you have been searching for a showstopper to impress your guests, this is the ultimate recipe to pin to your “Dream Desserts” board.
The beauty of the Triple Chocolate Mousse Domes lies in the perfect horizontal striations of dark, milk, and white chocolate. When you slice into the mirror-like surface, the contrast between the glossy exterior and the velvety, cloud-like interior is purely magical. Whether you are a seasoned baker or an ambitious home cook, this guide will walk you through the precise science of gelatin, aeration, and glazing to ensure professional results every single time.

Why These Triple Chocolate Mousse Domes Are a Total Showstopper
- Textural Perfection: Experience the transition from a snappy dark chocolate sponge base to three varying densities of melt-in-your-mouth mousse.
- High-Shine Aesthetic: The dark chocolate mirror glaze is so reflective you can practically see your own smile in it.
- Perfectly Balanced Flavors: We use high-quality cocoa solids to ensure the white chocolate isn’t too sweet and the dark chocolate provides a sophisticated bitterness.
- Make-Ahead Friendly: These domes actually benefit from a long freeze, making them the perfect stress-free dinner party dessert.
If you love working with rich cocoa profiles, you might also enjoy our Dark Chocolate Mount Doom Cake for your next big celebration. Much like that recipe, these Triple Chocolate Mousse Domes rely on the quality of your chocolate—so choose the best you can find!
Essential Ingredients for the Ultimate Mousse Layers
The Dark Chocolate Sponge Base: This provides the structural foundation. We use a thin, flexible chocolate Genoise or a simple cocoa-based sponge to keep the base light but sturdy enough to hold the weight of the mousses.
High-Quality Chocolate (Dark, Milk, and White): Since chocolate is the star, use couverture chocolate if possible. It contains a higher percentage of cocoa butter, which helps the Triple Chocolate Mousse Domes achieve that signature silky mouthfeel.
Heavy Cream (36% Fat): You will need a significant amount of cream, divided and whipped to soft peaks. The fat content is non-negotiable for the stability of the mousse layers.
Gelatin Leaves or Powder: This is the “glue” that keeps your Triple Chocolate Mousse Domes standing tall. We will bloom the gelatin carefully to ensure no lumps remain in your elegant dessert.
Edible Gold Leaf: A single, tiny fleck of edible gold leaf on the top center of each dome adds that final touch of “expensive” flair seen in the world’s best bakeries.
For those who enjoy miniature treats with big flavor, check out our Salted Caramel Pretzel Cheesecake Bites for another Pinterest-worthy dessert idea.
Crafting the Foundation: The Dark Chocolate Sponge
To start your Triple Chocolate Mousse Domes, we need a thin, circular base. Preheat your oven to 350°F (175°C). Line a flat baking sheet with parchment paper.
In a large bowl, whisk 2 large eggs with 1/4 cup (50g) of granulated sugar until the mixture is pale and tripled in volume. Sift in 3 tablespoons (25g) of all-purpose flour and 2 tablespoons (15g) of high-quality cocoa powder. Fold gently to maintain the air.
Spread the batter thinly across the pan and bake for 8-10 minutes. Once cooled, use a circular cookie cutter (slightly smaller than your dome mold diameter) to cut out your bases. Set these aside while you prepare the layers of the Triple Chocolate Mousse Domes.
The Art of the Three-Layer Mousse
The secret to the Triple Chocolate Mousse Domes is building them upside down in a silicone hemisphere mold. This ensures the top of the dome is perfectly smooth once unmolded.
Step 1: The Airy White Chocolate Mousse (The Top Layer)
Heat 1/4 cup (60ml) of heavy cream until just simmering. Pour over 1/2 cup (85g) of chopped white chocolate and 1/2 teaspoon of bloomed gelatin. Stir until smooth. Once cooled to room temperature, gently fold in 1/2 cup (120ml) of whipped heavy cream.
Fill the bottom third of your silicone molds with the white mousse. Place the mold in the freezer for 20 minutes to set. This prevents the colors from bleeding into each other, maintaining those perfectly horizontal layers.
Step 2: The Creamy Milk Chocolate Mousse (The Middle Layer)
Repeat the process using 1/2 cup (85g) of milk chocolate. Pour the milk chocolate mousse over the set white chocolate layer, filling the next third of the mold. Return to the freezer for another 20 minutes.
Consistency is key here. If your mousse is too runny, it will mix with the layer below. If it is too thick, you won’t get that flat line. Aim for a pourable but viscous texture for your Triple Chocolate Mousse Domes.
Step 3: The Rich Dark Chocolate Mousse (The Bottom Layer)
Finally, prepare the dark chocolate mousse layer using 1/2 cup (85g) of dark chocolate (60% cocoa). Pour this over the milk chocolate layer, leaving just enough room at the top of the mold to press in your pre-cut chocolate sponge circles.
Once the sponge is pressed gently onto the dark mousse, freeze the entire mold for at least 4-6 hours, or ideally overnight. The Triple Chocolate Mousse Domes must be rock-hard to be removed from the molds without tearing the delicate surface.

Achieving the Flawless Dark Chocolate Mirror Glaze
The mirror glaze is the most intimidating part of the Triple Chocolate Mousse Domes, but with a thermometer, it is foolproof. You want a glaze that is shiny, opaque, and covers the dome in a single, thin coat.
In a saucepan, combine 3/4 cup (150g) sugar, 1/2 cup (120ml) water, and 1/2 cup (150g) sweetened condensed milk. Bring to a boil, then remove from heat and stir in 4 sheets of bloomed gelatin. Pour this hot mixture over 1 cup (175g) of dark chocolate chips.
Let it sit for 2 minutes, then blend with an immersion blender. Crucial Tip: Keep the blender submerged to avoid creating air bubbles. Strain the glaze through a fine-mesh sieve into a clean pitcher.
Wait for the glaze to cool to exactly 90°F (32°C). This is the “Goldilocks” temperature—thick enough to cling to the Triple Chocolate Mousse Domes, but thin enough to flow smoothly over the edges.
If you find the process of working with gelatin fascinating, you might like the technical precision required for a Maple Buttercream Frosting, which also relies on specific temperature control for that perfect spreadable texture.
Glazing and Final Assembly
Prepare your glazing station. Place a wire rack over a clean baking sheet (to catch the excess glaze). Remove the frozen Triple Chocolate Mousse Domes from the silicone molds and place them immediately onto the rack.
In one fluid motion, pour the mirror glaze over each dome, starting from the center and spiraling outward. Ensure the glaze covers the sides completely. Let the excess drip off for 2-3 minutes. Use a small spatula to gently tuck the “drips” under the base before transferring the domes to a serving plate.
Garnish each dome with a single tiny fleck of edible gold leaf on the top center. The contrast of the gold against the dark, reflective glaze is what makes these Triple Chocolate Mousse Domes truly look like a professional masterpiece.
Expert Tips for Success
- Use a Thermometer: You cannot guess the temperature of mirror glaze. Even a 2-degree difference can cause the glaze to slide off or be too thick and lumpy.
- Eliminate Air Bubbles: If you see bubbles in your glaze, tap the pitcher on the counter firmly or use a toothpick to pop them before pouring.
- Keep the Domes Frozen: Do not take the Triple Chocolate Mousse Domes out of the freezer until the exact second you are ready to pour the glaze. The cold surface helps the glaze set instantly.
- Whip to Soft Peaks: When making the mousse, do not over-whip the cream to stiff peaks. Soft peaks create a much smoother, airier texture that is easier to fold into the chocolate.
For a perfect palate cleanser after such a rich dessert, consider serving these alongside some light Coffee Sugar Cookies—the bitterness of the coffee beautifully cuts through the sweetness of the white chocolate layer.
Storage and Serving Instructions
To Store: Keep the glazed Triple Chocolate Mousse Domes in an airtight container in the refrigerator for up to 3 days. The glaze will lose a bit of its shine over time but will still taste delicious.
To Freeze: You can freeze the unglazed domes (with the sponge base attached) for up to a month. Ensure they are wrapped tightly in plastic wrap to prevent freezer burn. Glaze them fresh before serving.
Serving: For the best texture, let the glazed domes sit in the refrigerator for at least 2 hours before serving. This allows the frozen mousse to thaw into a soft, creamy consistency while the glaze remains set.
Frequently Asked Questions
Absolutely! You can freeze the unglazed domes for up to a month. Glaze them 4-6 hours before you plan to serve for the best results.
Yes, but high-quality couverture chocolate is recommended. White chocolate chips often contain less cocoa butter and more fillers, which can result in a grainier texture in the mousse domes.
The key is freezing each layer for at least 15-20 minutes before adding the next one. This creates a solid surface so the new mousse doesn’t mix with the previous layer.
While hemisphere silicone molds are best for the ‘dome’ shape, you can make these in a lined muffin tin or small ramekins, though the unmolding process will be much more difficult.
A lack of shine is usually due to the temperature being too high when poured, or not using enough gelatin. Ensure you use an immersion blender to emulsify the chocolate and condensed milk perfectly.
The Official Triple Chocolate Mousse Domes Recipe

Triple Chocolate Mousse Domes with a High-Shine Mirror Glaze
Ingredients
Equipment
Method
- Whisk eggs and sugar until tripled in volume. Fold in cocoa and flour. Bake at 350°F (175°C) for 8-10 mins. Cut into circles once cool.
- Build layers starting with White Chocolate Mousse in the bottom of the mold. Freeze 20 mins between layers of Milk and Dark chocolate mousse. Top with sponge and freeze 6 hours.
- Cool mirror glaze to 90°F (32°C). Unmold frozen domes and pour glaze over them in a single motion. Garnish with gold leaf.
Notes
Ensure the domes are fully frozen before glazing or they will melt.
Share Your Masterpiece!
Did you manage to capture your reflection in the glaze? We want to see! Save this Triple Chocolate Mousse Domes recipe to your Pinterest boards and follow Bite_Journey for more professional-grade dessert tutorials. If you made these, please leave a 5-star rating in the recipe card above and upload a photo of your domes in the comments below!