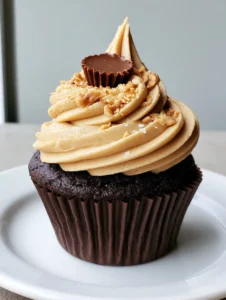
When it comes to the ultimate dessert indulgence, few things rival the iconic duo found in these Chocolate Peanut Butter Cupcakes. Imagine a crumb so dark and moist it practically melts on your tongue, topped with a cloud-like swirl of pale tan buttercream. The visual contrast between the dark brown pleated paper liner and the golden frosting makes these a showstopper for any Pinterest board or dessert table.
These Chocolate Peanut Butter Cupcakes aren’t just a treat; they are a masterclass in texture and balance. By combining a deep, Dutch-processed cocoa sponge with the salty-sweet richness of roasted peanuts, we create a flavor profile that is sophisticated yet nostalgic. Whether you are looking for cheap Saturday night dinner ideas to follow up with a grand finale or just need a midweek pick-me-up, this recipe delivers professional bakery results from your home kitchen.

Why These Are the Best Chocolate Peanut Butter Cupcakes You’ll Ever Bake
- The Ultra-Moist Crumb: We use a specific “blooming” technique for the cocoa powder to ensure every bite of the Chocolate Peanut Butter Cupcakes is intensely chocolatey.
- The Tall Buttercream Swirl: This frosting is engineered for stability, allowing you to create that iconic high-piped peak seen in professional bakeries.
- The Perfect Garnish: A mini peanut butter cup pressed into the center adds a hidden layer of texture, while crushed roasted peanuts provide a necessary crunch.
- Salted Finish: A light sprinkle of sea salt flakes cuts through the sugar, highlighting the roasted notes of the peanut butter.
The Anatomy of a Perfect Dark Cocoa Sponge
To achieve the visual of a moist, dark cocoa sponge with a visible soft crumb, we must pay attention to our leavening agents and moisture sources. Unlike a traditional vanilla cake, Chocolate Peanut Butter Cupcakes require a high hydration level to prevent the cocoa from drying out the delicate structure.
1.5 cups (190g) All-Purpose Flour: This provides the structural foundation. Be sure to spoon and level your flour to avoid a dense, “bready” cupcake.
1 cup (200g) Granulated Sugar & 1/2 cup (100g) Brown Sugar: The brown sugar adds a hint of molasses flavor and essential moisture that keeps the Chocolate Peanut Butter Cupcakes fresh for days.
3/4 cup (65g) Dark Dutch-Processed Cocoa Powder: For that signature “Mount Doom” aesthetic (similar to our Dark Chocolate Mount Doom Cake), Dutch-processed cocoa is non-negotiable. It provides the deep, dark brown color and a smooth, mellow flavor.
1.5 tsp (7g) Baking Soda & 1 tsp (5g) Baking Powder: This dual-action lift ensures a flat-topped cupcake that is perfect for piping high swirls of frosting.
1 cup (240ml) Full-Fat Buttermilk: The acidity in buttermilk reacts with the baking soda to create an incredibly tender, soft crumb.
1/2 cup (120ml) Neutral Oil: While butter provides flavor, oil provides superior moisture in chocolate cakes, ensuring your Chocolate Peanut Butter Cupcakes never feel dry.
1/2 cup (120ml) Hot Coffee or Boiling Water: This “blooms” the cocoa, dissolving any lumps and intensifying the chocolate flavor compounds. If you love coffee notes in your bakes, you’ll also enjoy our coffee sugar cookies.
Crafting the Pale Tan Peanut Butter Buttercream
The crowning glory of these Chocolate Peanut Butter Cupcakes is the frosting. We are aiming for a thick, pale tan peanut butter buttercream frosting that holds its shape even at room temperature.
1 cup (225g) Unsalted Butter, softened: High-quality European-style butter will give you the creamiest mouthfeel.
3/4 cup (190g) Creamy Peanut Butter: Avoid “natural” style peanut butters that separate. You need a stabilized commercial brand (like Jif or Skippy) to ensure the emulsion doesn’t break.
3-4 cups (360-480g) Powdered Sugar: Adjust this based on your desired stiffness. More sugar equals a more stable “tall decorative pipe-work swirl.”
2-3 tbsp (30-45ml) Heavy Cream: This transforms the heavy frosting into a “whipped” consistency. If you prefer a lighter, floral sweetness, check out our maple buttercream frosting.

Step-by-Step Instructions for Chocolate Peanut Butter Cupcakes
Preparing the Chocolate Sponge Base
Preheat and Prep: Begin by preheating your oven to 350°F (175°C). Line a standard muffin tin with dark brown pleated paper liners. These liners provide a professional, sleek aesthetic that makes the cupcake colors pop.
Whisk Dry Ingredients: In a large mixing bowl, sift together the flour, sugars, dark cocoa powder, baking soda, baking powder, and 1 tsp (6g) fine sea salt. Sifting is crucial here to prevent cocoa clumps.
Combine Wet Ingredients: In a separate jug, whisk together the buttermilk, oil, eggs, and 2 tsp (10ml) vanilla extract. Gradually pour the wet ingredients into the dry, whisking until just combined.
The Hot Water Trick: Gently stir in the hot coffee or boiling water. The batter will be very thin and liquid—this is exactly what we want for that visible soft crumb.
Baking: Fill each dark brown pleated paper liner about two-thirds full. Bake for 18-22 minutes. You are looking for a visual cue: the tops should spring back when lightly touched and a toothpick should come out clean.
Whipping the Peanut Butter Buttercream
Cream the Base: In a stand mixer fitted with the paddle attachment, beat the softened butter and creamy peanut butter on medium-high speed for at least 3 full minutes. It should look very pale and fluffy.
Add the Sugar: Turn the mixer to low and gradually add the powdered sugar one cup at a time. Once incorporated, increase speed and beat for another minute.
Emulsify with Cream: Add the heavy cream and a pinch of salt. Switch to the whisk attachment and whip on high for 2 minutes until the frosting looks like a “tall, decorative pipe-work swirl” waiting to happen.
The Art of Assembly and Garnish
Piping: Use a large open star tip (like a Wilton 1M). Start in the center of the cooled Chocolate Peanut Butter Cupcakes, move to the edge, and spiral upward to create a tall, decorative pipe-work swirl.
The Signature Garnish: While the buttercream is still fresh, press a single mini peanut butter cup into the very peak of the frosting swirl. This mimics the visual found in the best artisan bakeries.
Final Textures: Sprinkle a generous pinch of finely crushed roasted peanuts over the buttercream. Finish with a few tiny flakes of sea salt to highlight the dark cocoa notes. The result should look like a “handheld smartphone photo” masterpiece: raw, authentic, and delicious.

Expert Tips for Bakery-Style Cupcakes
- Room Temperature Ingredients: Ensure your eggs, buttermilk, and butter are all at room temperature. This creates a smooth emulsion and prevents the batter from curdling.
- Don’t Overmix: Once you add the flour, mix only until the white streaks disappear. Overmixing develops gluten, which leads to tough Chocolate Peanut Butter Cupcakes.
- The Cooling Rule: Never frost a warm cupcake. The pale tan peanut butter buttercream will melt and slide off the dark brown pleated paper liner. Wait at least 60 minutes.
- Crushing the Peanuts: For the best visual, pulse your peanuts in a food processor for only 2-3 seconds. You want “crushed,” not “powdered.”
Storage, Reheating, and Freezing
Room Temperature: These cupcakes stay moist for up to 2 days in an airtight container at room temperature. The Chocolate Peanut Butter Cupcakes sponge actually improves in flavor on day two!
Refrigeration: If your kitchen is warm, store them in the fridge for up to 5 days. Let them sit at room temperature for 20 minutes before serving to soften the buttercream swirl.
Freezing: You can freeze the unfrosted chocolate sponges for up to 3 months. Wrap them tightly in plastic wrap. Thaw at room temperature before adding the fresh peanut butter frosting.
What to Serve With These Cupcakes
If you’re hosting a dessert party, these cupcakes pair beautifully with other salty-sweet treats. Consider serving them alongside our salted caramel pretzel cheesecake bites for a full spread of textures. A cold glass of milk or a strong espresso is the perfect beverage to cut through the richness of the whipped peanut butter buttercream.
Frequently Asked Questions
Yes, you can substitute the all-purpose flour with a high-quality 1:1 gluten-free baking flour blend. The moisture from the buttermilk will keep them tender.
No, natural peanut butter that requires stirring is too oily and will cause the buttercream to separate. Use a stabilized commercial brand for the best results.
The secret is to use a large piping tip and a stiff buttercream. If your frosting is too soft, add more powdered sugar or chill it for 10 minutes before piping.
Dutch-processed cocoa powder is best. It is treated with alkali to neutralize acidity, resulting in a darker color and a smoother, less bitter chocolate flavor.
Cupcakes usually sink if the oven door is opened too early or if the batter was over-aerated during mixing. Ensure you only whisk until ingredients are combined.
The Ultimate Chocolate Peanut Butter Cupcakes Recipe

Chocolate Peanut Butter Cupcakes with Silky Whipped Frosting
Ingredients
Equipment
Method
- Preheat oven to 350°F (175°C) and line a muffin tin with dark brown pleated paper liners.
- Whisk dry ingredients, then add wet ingredients excluding hot liquid. Stir in hot coffee last until batter is thin.
- Fill liners 2/3 full and bake for 18-22 minutes until a toothpick comes out clean. Cool completely.
- Beat butter and peanut butter for 3 minutes. Gradually add powdered sugar and cream until fluffy.
- Pipe a tall swirl on each cupcake. Press a mini peanut butter cup into the center and sprinkle with crushed peanuts and sea salt.
Notes
Ensure cupcakes are fully cooled before frosting to prevent melting.
Join the Bite Journey Community!
Did you make these Chocolate Peanut Butter Cupcakes? We want to see your tall frosting swirls! Save this recipe to your “Dream Desserts” board on Pinterest and follow Bite_Journey for more high-flavor, high-style recipes. Don’t forget to upload a photo of your cupcakes in the comments below and leave us a 5-star rating if you loved them!