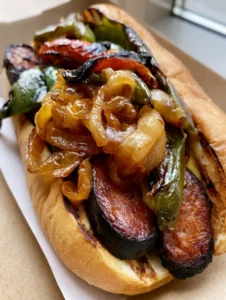
This Grilled Kielbasa Sandwich is the ultimate outdoor cookout upgrade, featuring thick, juicy slices of beef sausage nestled in a perfectly toasted hoagie bun. When you combine the smoky snap of grilled beef kielbasa with the deep, jammy sweetness of caramelized sweet onions and the rustic bite of charred red and green bell peppers, you create a flavor profile that is absolutely addictive. Whether you are looking for cheap Saturday night dinner ideas or a crowd-pleasing lunch, this sandwich delivers high-end deli vibes straight from your backyard grill. The glistening texture of the meat and the vibrant colors of the blistered peppers make this a visual masterpiece that is as fun to photograph as it is to eat.

Why This Grilled Kielbasa Sandwich Works Every Time
- Explosive Visual Appeal: The contrast between the golden-brown toasted bun, the dark charred edges of the kielbasa, and the vibrant red and green peppers creates a professional, “Pinterest-viral” aesthetic.
- Perfect Texture Balance: You get a satisfying “snap” from the sausage casing, a soft crunch from the toasted hoagie, and a silky melt-in-your-mouth finish from the onions.
- Simplified Gourmet: Using high-quality beef kielbasa elevates a humble sandwich into a gourmet meal with very little active prep time.
- Customizable Heat: While we use a sweet honey mustard drizzle, you can easily swap in Roasted Jalapeño Cowboy Cream Cheese (coming soon) for a spicy, creamy kick.
The Anatomy of a Perfect Sausage Sandwich: Essential Ingredients
To achieve the specific look and taste of this Grilled Kielbasa Sandwich, high-quality ingredients are non-negotiable. Every element is designed to stand up to the high heat of the grill while contributing to the “juicy, glistening texture” described in our visual blueprint.
Beef Kielbasa: 1 lb (450g) of premium beef kielbasa. Look for “U-shaped” rings which offer the best fat-to-lean ratio. Slicing these into thick coins ensures every piece gets those signature dark charred edges.
Hoagie Buns: 4 sturdy, long hoagie rolls. You need a bread that can support the weight of the fillings without falling apart. A brioche-style hoagie adds a lovely hint of sweetness.
Sweet Onions: 2 large Vidalia or Walla Walla onions (approx. 500g). These have a higher sugar content, which is essential for achieving that translucent golden-brown caramelized finish.
Bell Peppers: 1 large green and 1 large red bell pepper. We want the skins to be blistered and charred to provide a smoky depth that mimics wood-fired cooking.
Honey Mustard: 1/4 cup (60ml) of your favorite honey mustard. This provides the acidic brightness needed to cut through the richness of the beef sausage.
Butter & Oil: 2 tbsp (30g) unsalted butter for the buns and 2 tbsp (30ml) neutral oil (like avocado or canola) for the high-heat grilling of the vegetables.
The Seasoning: A simple pinch of Kosher salt and freshly cracked black pepper. If you want to experiment with different flavor profiles, consider adding a layer of Apple Whiskey Bacon Jam for an even deeper smoky-sweet experience.

Mastering the Grill: Step-by-Step Instructions
Phase 1: Achieving the Perfect Onion Caramelization
Start your onions first, as they take the longest to reach that jammy, translucent state. Thinly slice your sweet onions into half-moons. In a cast-iron skillet placed directly on the grill grates (or on your stovetop), heat 1 tbsp of oil over medium-low heat.
Add the onions with a pinch of salt. Sauté slowly, stirring occasionally. You are looking for a deep golden-brown hue. Do not rush this process; the natural sugars need time to break down to achieve the texture seen in the Grilled Kielbasa Sandwich blueprint. This usually takes 20-25 minutes.
Phase 2: Charring the Peppers for Maximum Smoke
Slice your red and green bell peppers into long, 1/2-inch (1.25cm) strips. Toss them in a bowl with the remaining tablespoon of oil and a pinch of salt. Place a grill basket on the grill or place the strips directly across the grates if they are thick enough.
Grill over high heat (400°F / 200°C) until the skins are blistered and show dark char marks. They should still have a slight “bite” to them and shouldn’t be mushy. Remove from heat and set aside with the onions.
Phase 3: Searing the Beef Kielbasa Slices
Slice the beef kielbasa into 1/2-inch thick coins on a slight bias. This increased surface area allows for more Maillard reaction (browning). Place the slices directly onto the hot grill grates.
Grill for 3-4 minutes per side. Watch for the edges to curl slightly and develop a dark, crispy char while the centers remain juicy and glistening. The sound of the fat sizzling is your cue that they are ready.
Phase 4: Toasting the Hoagie Buns
Split your hoagie buns and spread a thin layer of butter on the cut sides. Place them face-down on the cooler side of the grill. You want visible grill marks on the inside and a golden-brown exterior. This usually takes only 60-90 seconds. Do not walk away, as bread burns quickly!
Phase 5: The Final Assembly
Place a generous layer of the grilled beef kielbasa slices into the toasted bun. Top with a heavy pile of caramelized onions and a mix of charred red and green peppers. Finish with a thin drizzle of honey mustard sauce between the layers to tie everything together. Serve immediately in a simple paper liner for that authentic handheld feel.
Expert Tips for the Ultimate Grilled Kielbasa Sandwich
- Don’t Overcrowd the Grill: Give your sausage slices space to breathe so they sear rather than steam.
- Temperature Control: If the kielbasa is browning too fast, move it to the “indirect heat” zone of your grill to finish warming through.
- The “Snap” Test: High-quality kielbasa should have a distinct “snap” when you bite into it. If the casing is tough, you might need a higher heat for a shorter duration.
- Prep Ahead: You can caramelize the onions up to 3 days in advance and just reheat them on the grill in a foil packet!
Storage, Reheating, and Make-Ahead Advice
While this Grilled Kielbasa Sandwich is best enjoyed fresh off the grates, you can store the components separately. Keep the grilled meat and vegetables in an airtight container in the fridge for up to 4 days. To reheat, we recommend using a skillet or air fryer to maintain the charred texture of the meat and peppers. Avoid the microwave, as it will make the toasted hoagie bun soggy.
What to Serve With Your Sausage Feast
To balance the smoky richness of the beef, we recommend a light and acidic side dish. Our Mediterranean Pasta Salad is a fantastic choice, providing a cool contrast to the hot sandwich. If you’re hosting a larger BBQ and want more handheld options, consider serving these alongside a juicy ground turkey burger recipe for those who prefer poultry over beef.
Frequently Asked Questions
Yes! You can grill the kielbasa and sauté the onions and peppers ahead of time. Store them in the fridge and quickly toss them on the grill in a foil packet to reheat before assembling on freshly toasted buns.
The key is high heat and short duration. Use a preheated grill at 400°F (200°C) and grill the strips until the skin blisters. Remove them immediately to retain a slight crispness.
While both work, slicing into thick coins on a bias (diagonally) provides more surface area for charring, which results in more flavor and a more visually appealing sandwich.
For the most authentic flavor and texture, use a smoked beef kielbasa. It provides a rich, savory base that stands up well to the high heat of the grill and pairs perfectly with sweet onions.
The honey mustard provides a sweet and tangy balance that complements the caramelized onions and cuts through the salty, smoky profile of the beef sausage better than plain mustard.
The Complete Grilled Kielbasa Sandwich Recipe

Grilled Kielbasa Sandwich with Caramelized Onions and Charred Peppers
Ingredients
Equipment
Method
- Sauté sliced onions in oil over medium-low heat until translucent and golden-brown, about 20-25 minutes.
- Grill pepper strips until skins are blistered and charred. Grill kielbasa slices until edges are dark and crispy.
- Toast buttered buns until grill marks appear. Layer sausage, onions, and peppers, then drizzle with honey mustard.
Notes
Keep onions on low heat to prevent burning while caramelizing.

Save This Recipe to Pinterest!
If you loved this Grilled Kielbasa Sandwich, make sure to save it to your “Grilling Recipes” or “Easy Dinner Ideas” board on Pinterest! Following @Bite_Journey ensures you never miss a seasonal recipe. If you make this at home, please snap a photo and share it in the comments below—we love seeing your charred peppers and glistening kielbasa! Don’t forget to leave a 5-star rating if this becomes your new favorite Saturday night meal.