If you are searching for the ultimate effortless dessert that delivers maximum decadent satisfaction, look no further than this homemade Chocolate Peanut Butter Dump Cake. This recipe is specifically designed for busy home bakers who refuse to compromise on gourmet flavor and rich, multi-layered textures. By pairing a deeply intense, fudgy chocolate foundation with thick, velvety ribbons of peanut butter, you create a viral-worthy dessert that commands attention on any dessert table.
Unlike traditional cakes that require extensive creaming, sifting, and multiple mixing bowls, this Chocolate Peanut Butter Dump Cake streamlines the process into a single baking dish. It is the perfect sweet finale to round out your favorite comfort food menus, standing proud alongside hearty family classics like our curated cheap saturday night dinner ideas. Let’s dive deep into what makes this particular bake an absolute triumph of modern convenience and culinary science.
Why This Viral Peanut Butter Chocolate Bake Wins Every Single Time
- Unbelievable Texture Contrast: You get a magnificent contrast between the aerated, set outer crust and a wonderfully molten, gooey center.
- Effortless Preparation: No hand mixers, stand mixers, or complex culinary techniques are required to achieve a professional-grade crumb.
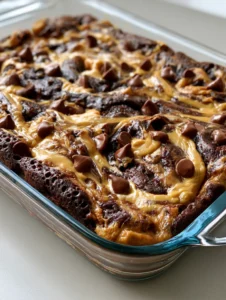
- Visually Stunning Presentation: The dramatic contrast of dark, fudgy chocolate contrasting with thick, golden-tan peanut butter swirls creates an instant visual masterpiece.
- Pantry-Staple Friendly: This recipe relies heavily on foundational ingredients you likely already have tucked away in your kitchen cabinets.

The Deep Culinary Science Behind the Perfect Gooey Dump Cake Texture
Achieving the perfect balance in a Chocolate Peanut Butter Dump Cake requires understanding how ingredients interact under heat without manual emulsification. Standard dump cakes can occasionally suffer from dry, unhydrated patches of cake mix if the liquids are not distributed with precision. To eliminate this issue entirely, our method introduces a structured hydration technique that guarantees a completely moist base every single time.
By utilizing an instant chocolate pudding mix alongside the standard cake mix, we introduce modified cornstarches that readily absorb liquids and retain moisture throughout the entire baking cycle. As the liquid layer heats up, it dissolves the sugar and activates the leavening agents within the dry mix, causing the edges to rise, aerate, and set perfectly against the sides of your baking dish. Meanwhile, the interior remains protected from excessive evaporation, leaving you with an extraordinarily rich, fudgy, and gooey center.
The behavior of fats during this process is equally fascinating. The lipids in the melted butter coat the flour proteins, effectively slowing down gluten development to ensure the cake remains tender rather than tough or rubbery. When the creamy peanut butter is swirled across the top surface, its high oil content prevents it from sinking entirely to the bottom, allowing it to form thick, distinct, and decadent ribbons that hold their shape beautifully during baking.
Every Ingredient You Need for This Show-Stopping Dessert
To create the absolute best version of this Chocolate Peanut Butter Dump Cake, selecting high-quality, high-performance ingredients is essential. Here is exactly what you will need to gather before assembling your masterpiece in the kitchen:
- 1 box (15.25 oz / 432g) Dark Chocolate or Devil’s Food Cake Mix: This provides the intensely deep, cocoa-rich foundation for your cake base.
- 1 box (3.9 oz / 110g) Instant Chocolate Pudding Mix: The secret weapon that guarantees a consistently gooey center and enhances the overall fudgy texture.
- 1.5 cups (360ml) Whole Milk: Provides the vital hydration needed to dissolve the dry mixes fully and activate the leavening agents.
- 1/2 cup (115g) Unsalted Butter, melted: Adds essential richness, helps create those beautifully aerated, crispy set edges, and develops a deep flavor profile.
- 1 cup (250g) Creamy Peanut Butter: Standard commercial creamy peanut butter works best here to deliver those thick, molten, beautiful tan swirls across the top.
- 1 cup (170g) Semi-Sweet Chocolate Chips: Scattered across the surface to provide glossy, partially melted pockets of intense chocolate flavor throughout the dish.
Step-by-Step Guide to Baking the Ultimate Dump Cake
Follow these meticulously tested steps to assemble and bake your Chocolate Peanut Butter Dump Cake to absolute perfection. Pay close attention to the sensory and visual cues described to ensure your final bake matches the elite standards of a professional kitchen.
Step 1: Prep and Prime Your Equipment
Preheat your conventional oven to 350°F (177°C). Select a clean, clear glass rectangular baking dish measuring 9×13 inches (23×33 cm). Using a clear glass dish is a brilliant strategy for this recipe, as it allows you to easily monitor the browning of the base and ensures the outer edges set beautifully without overcooking the delicate, gooey interior.
Step 2: Layer the Decadent Dry Foundation
Empty the entire contents of the dark chocolate cake mix and the instant chocolate pudding mix directly into the bottom of your glass dish. Use a dry whisk or a fork to gently toss the two dry powders together until they are evenly distributed. Spread the mixture into an even, level layer across the entire bottom of the pan, ensuring it reaches into all four corners.
Step 3: Introduce the Hydration Layer
Pour the whole milk and the melted unsalted butter evenly over the dry cake and pudding mixture. Take a fork and gently stir the ingredients directly inside the baking dish. You are not trying to beat air into a smooth batter; rather, you simply want to ensure all dry pockets are thoroughly moistened. The mixture should look thick, rich, and somewhat irregular.

Step 4: Craft the Iconic Creamy Peanut Butter Swirls
Warm your creamy peanut butter in the microwave for roughly 20-30 seconds until it reaches a easily pourable, fluid consistency. Drop the warmed peanut butter by the generous spoonful across the top of the chocolate base. Take a clean butter knife and gently drag it through the dollops, creating thick, dramatic, and luxurious swirls of beautiful tan peanut butter across the entire dark chocolate surface.
Step 5: Embellish with Chocolate Chips and Bake
Scatter the semi-sweet chocolate chips evenly over the top of the swirled peanut butter layer. Place the glass dish on the center rack of your preheated oven and bake for 30 to 35 minutes. Keep a close eye on the oven during the final few minutes of baking to catch the exact moment your cake achieves structural perfection.
Step 6: Identify the Critical Visual Cues
Remove the cake from the oven when the outer edges are visibly aerated, slightly puffed, and completely set. The center of the Chocolate Peanut Butter Dump Cake should still look incredibly moist, glossy, and delightfully gooey. The scattered semi-sweet chocolate chips will be beautifully glinting, partially melted, and perfectly suspended within the golden-tan peanut butter ribbons.
Insider Baking Tips for Unmatched Kitchen Success
To help you achieve flawless results on your very first attempt, we have compiled our top professional kitchen tips for mastering this decadent bake:
- Avoid Natural Peanut Butters: Avoid using completely natural oils-separated peanut butters for this recipe. The lack of conventional stabilizers causes the oil to separate under high heat, which can make your cake greasy rather than beautifully swirled.
- Check for Dry Spots Before Baking: Always double-check the bottom corners of your clear glass dish before sliding it into the oven. If you spot any unhydrated white or brown pockets of dry flour, gently poke them with a fork to allow the liquid to penetrate.
- Control the Gooey Factor: If you prefer a firmer cake texture throughout rather than an ultra-ooey-gooey center, simply extend the total baking time by 5 to 7 minutes until the center jiggles only slightly when nudged.
- Embrace the Minimalist Aesthetic: This cake is so inherently rich and visually striking with its dual-toned top that it requires absolutely no extra garnishes, dustings, or toppings to look completely irresistible.
How to Seamlessly Store, Reheat, and Freeze Your Cake
If you somehow find yourself with leftovers of this spectacular dessert, storing it correctly will preserve that magical texture for days to come. Allow the cake to cool down entirely to room temperature inside the glass baking dish. Cover the dish tightly with a layer of plastic wrap or heavy-duty aluminum foil and store it in the refrigerator for up to 4 days.
When you are ready to enjoy another portion, reheating is incredibly simple. To restore that straight-from-the-oven molten experience, place a desired portion on a microwave-safe plate and heat it on medium power for 20-30 seconds. The peanut butter ribbons will soften instantly, and the chocolate base will return to its signature fudgy, ultra-gooey state.
For long-term storage, this cake freezes surprisingly well. Slice the cooled cake into individual portions and wrap each square tightly in plastic wrap, followed by a sturdy layer of aluminum foil. Label the packets and store them in the freezer for up to 3 months. Thaw overnight in the refrigerator before reheating according to the instructions above.
Sensational Flavor Pairings: What to Serve Alongside This Bake
While this rich and decadent cake easily stands completely on its own, pairing it with complementary flavors can elevate your dessert experience to a whole new level. For an incredible study in chocolate excellence, consider serving it alongside our intensely dramatic dark chocolate mount doom cake at your next major celebration.
If you want to introduce a touch of sweet, buttery contrast to the deep cocoa and salty-sweet peanut butter notes, a side of treats decorated with a smooth maple buttercream frosting offers an unexpected and deeply satisfying pairing. Alternatively, for a delightful contrast of textures during coffee hour, try serving small slices of this warm cake with a few crisp, sophisticated coffee sugar cookies to balance out the richness perfectly.
Frequently Asked Questions About This Recipe
Absolutely! You can easily adapt this recipe by substituting the standard cake mix with your favorite high-quality store-bought gluten-free chocolate cake mix. Always double-check that your instant chocolate pudding mix is also certified gluten-free.
It is highly recommended to avoid completely natural style peanut butters where the oil separates. The lack of stabilizers causes the natural oils to separate completely under high heat, making your cake base unpleasantly greasy rather than creating thick, creamy, distinct swirls.
Yes, because of the dairy content in the milk and the moist environment of the gooey center, any leftover cake should be covered tightly and stored inside the refrigerator for up to 4 days.
Simply place an individual portion of the cake onto a microwave-safe plate and heat it on medium power for 20-30 seconds. This immediately melts the chocolate chips and softens the peanut butter swirls back to their original molten state.
To eliminate dry spots completely, use a clear glass baking dish and gently toss the cake mix and pudding mix together first. When you pour over the milk and melted butter, use a fork to lightly stir and distribute the liquids so all dry pockets are thoroughly hydrated before baking.
The Ultimate Chocolate Peanut Butter Dump Cake Recipe Card

Chocolate Peanut Butter Dump Cake: The Ultimate Gooey Dessert
Ingredients
Equipment
Method
- Preheat your conventional oven to 350°F (177°C) and grab a 9x13-inch (23x33 cm) clear glass rectangular baking dish.
- Empty the dark chocolate cake mix and instant chocolate pudding mix directly into the dish, whisking together until evenly blended.
- Pour the whole milk and melted unsalted butter directly over the dry layer. Stir gently with a fork to ensure all dry pockets are thoroughly moistened.
- Warm the creamy peanut butter for 20-30 seconds until fluid. Drop by the spoonful across the top and drag a butter knife through to create thick tan swirls.
- Scatter the semi-sweet chocolate chips evenly across the surface. Bake for 30 to 35 minutes until the edges are aerated and set, while the center remains incredibly moist and gooey.
Notes
Check the corners of your clear glass baking dish for dry flour pockets before baking.
Join the Bite_Journey Community and Share Your Creations!
We are absolutely convinced that this spectacular dessert is going to become an instant favorite in your household rotation. Before you run off to the kitchen to gather your ingredients, make sure to take a brief moment to save this recipe to your favorite dessert boards on Pinterest so you never lose track of it!
Be sure to follow our official Pinterest page at @Bite_Journey for an endless stream of mouthwatering recipe inspiration, professional baking secrets, and quick weeknight meal solutions. Once your cake emerges from the oven looking beautifully swirled and impossibly gooey, snap a quick picture and share it with us in the comments section below! Do not forget to leave us a 5-star rating if you fell in love with every rich, decadent bite.