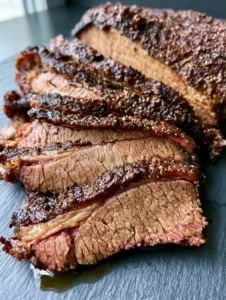
There is nothing quite as mesmerizing as a thick, rustic slice of this spectacular Loaf Pan Cheesecake resting on a simple ceramic plate. If you have ever craved the luxurious texture of a classic dessert but wanted a smaller, more manageable batch, this recipe is your golden ticket. The signature dark caramelized crust perfectly contrasts with a remarkably rich, creamy interior that melts in your mouth.
Every bite of this authentic, home-cooked masterpiece delivers a symphony of textures and flavors. By utilizing a standard baking pan, you bypass the need for fussy springform pans and water baths. This Loaf Pan Cheesecake is the ultimate testament to the beauty of intentional imperfections, featuring those coveted, crinkly burnt edges.
Whether you are serving a cozy weekend dinner or just treating yourself, this rustic delight promises a mouth-watering experience. Grab a vintage fork and prepare to dive into a dessert that looks like it belongs in a high-end European bakery, yet is effortlessly crafted right in your own kitchen.
 1")
Why This Caramelized Loaf Pan Cheesecake Masterpiece Works
- Convenient Small-Batch Size: Traditional Basque recipes require massive amounts of dairy and large specialty pans. This Loaf Pan Cheesecake uses a standard 9×5-inch (23x13cm) pan, yielding the perfect amount for a small gathering.
- Zero Crust Required: Skip the tedious graham cracker crushing and butter melting. The high-heat baking process naturally creates a gorgeous, dark caramelized outer layer that acts as its own crust.
- Foolproof Creamy Interior: By baking at a high temperature for a shorter period, the edges set and caramelize while the center remains incredibly lush and jiggly.
- Rustic Visual Appeal: The crumpled parchment paper lining creates stunning, organic folds in the batter. It delivers that authentic, home-cooked aesthetic without any stressful decorating.
The Scientific Building Blocks of a Creamy Center
Full-Fat Cream Cheese (Block Style): You will need 16 oz (450g) of high-quality, full-fat cream cheese. It must be softened to room temperature to ensure a lump-free batter. Avoid tub-style spreads, as their water content will ruin the structure.
Granulated White Sugar: Using 3/4 cup (150g) of sugar provides the essential sweetness and aids in the rapid caramelization of the crust. The sugar melts into the cream cheese, creating a glossy, smooth foundation.
Large Eggs: You need 3 large eggs (approx. 150g total), strictly at room temperature. They provide the necessary protein matrix to give the slice its hearty, thick texture while keeping the center airy.
Heavy Whipping Cream: Pouring in 1 cup (240ml) of heavy cream (at least 36% fat) is the secret to the rich, creamy interior. This high fat content prevents the eggs from over-scrambling and guarantees a velvety mouthfeel.
All-Purpose Flour: Just 1 tbsp (8g) of flour acts as a structural insurance policy. It binds the excess moisture, ensuring your thick slice holds its shape perfectly on the plate without weeping.
Vanilla Extract & Kosher Salt: Adding 1 tsp (5ml) of pure vanilla extract and 1/2 tsp (3g) of kosher salt enhances the complex dairy flavors. The salt balances the deep, almost bitter notes of the burnt top.
Essential Tools for a High-Heat Bake
To achieve this specific rustic texture, you need a heavy-duty 9×5-inch (23x13cm) metal loaf pan. Metal conducts the high heat efficiently, ensuring the sides caramelize deeply. Avoid glass or ceramic for this specific baking phase.
You will also need unbleached parchment paper to line the pan. Crumpling the paper under water and squeezing it out makes it pliable, allowing it to fit the corners of the pan and create those beautiful, rustic ridges along the sides.
A stand mixer with a paddle attachment or a reliable electric hand mixer is crucial. You must beat the cream cheese thoroughly to aerate it before adding the eggs, ensuring a perfectly smooth interior.
Crafting Your Masterpiece: Step-by-Step Guide
Preparing the Pan and Oven
Preheat your oven to 400°F (200°C) with the rack placed in the middle position. Take a large sheet of parchment paper and crumple it tightly into a ball. Flatten it out and press it deeply into your 9×5-inch (23x13cm) loaf pan, ensuring the paper extends at least 2 inches (5cm) above the rim.
Creaming the Base to Silky Perfection
In a large mixing bowl, beat the 16 oz (450g) of softened cream cheese and 3/4 cup (150g) of granulated sugar on medium speed. Mix for about 2 to 3 minutes until the mixture is completely smooth and the sugar crystals have dissolved. Scrape down the sides and bottom of the bowl with a silicone spatula to prevent hidden lumps.
Incorporating the Eggs Safely
With the mixer running on low speed, add the 3 room-temperature eggs one at a time. Wait until the first egg is fully incorporated before adding the next. This slow emulsion prevents the batter from breaking and guarantees a rich, creamy interior.
 2")
Whisking in the Final Rich Ingredients
Sift the 1 tbsp (8g) of all-purpose flour and 1/2 tsp (3g) of kosher salt over the batter. Pour in the 1 cup (240ml) of heavy cream and 1 tsp (5ml) of vanilla extract. Mix on low speed just until the batter is homogeneous and silky. Do not overmix at this stage, or you will incorporate too much air, causing the cake to deflate rapidly later.
Baking for that Dark Caramelized Crust
Pour the batter into your prepared loaf pan, tapping it gently on the counter to release any trapped air bubbles. Bake at 400°F (200°C) for 35 to 40 minutes. You are looking for a dark amber to almost burnt top, while the center should still have a significant, dramatic jiggle when the pan is gently shaken.
The Crucial Cooling Phase
Remove the pan from the oven and let it cool completely on a wire rack for at least 2 hours. The cake will puff up in the oven and dramatically sink as it cools—this is exactly what creates that authentic, hearty texture. Once at room temperature, chill in the refrigerator for at least 4 hours, preferably overnight, before slicing.
Pro Secrets for the Perfect Burnt Top
- Temperature is Everything: If your cream cheese or eggs are cold, your batter will be lumpy. Submerge cold eggs in warm water for 10 minutes, and microwave the cream cheese in 10-second bursts if you forgot to leave it out.
- The Crumbled Parchment Trick: Don’t try to fold the parchment neatly. Crumpling it aggressively gives the finished dessert its iconic, rustic, bakery-style edges.
- Trust the Jiggle: The most common mistake is overbaking. If the center looks completely set in the oven, it is overdone. It must wobble like a set pudding to ensure a rich, creamy interior once chilled.
- Broil for Extra Color: If your cake has baked for 40 minutes but hasn’t achieved that signature dark caramelized crust, turn on the broiler for 1-2 minutes. Watch it like a hawk to prevent it from turning to ash.
Keeping Your Loaf Pan Cheesecake Fresh
Because of its high dairy content, this dessert must be kept refrigerated. Wrap the loaf pan tightly in plastic wrap, or place individual slices in an airtight container. It will stay remarkably fresh and creamy in the fridge for up to 5 days.
You can also freeze this dessert beautifully. Wrap individual thick, rustic slices in parchment paper, then in heavy-duty aluminum foil. Freeze for up to 3 months. Thaw a slice overnight in the refrigerator before serving to preserve the velvety texture.
Perfect Pairings for Your Dessert Spread
While this dessert stands beautifully on its own, it pairs wonderfully with other homemade treats. If you are hosting a large gathering, serve slices alongside a tray of rich cannoli cheesecake bars for a diverse dessert table.
For the ultimate sweet tooth, a contrast of textures is key. The smooth creaminess of this dessert pairs exceptionally well with a dense, fudgy chocolate brownie cake. Alternatively, keep things light and classic by offering some fluffy homemade vanilla cupcakes to your guests.
If you’re curating a holiday gift box, consider wrapping a slice of this rustic cheesecake alongside some decadent rich chocolate fudge. The contrast between the caramelized cheesecake crust and the sweet chocolate is divine.
Answering Your Baking Curiosities
No. You must let the cheesecake cool completely at room temperature, then chill it in the refrigerator for at least 4 hours. Slicing it warm will result in a messy, liquid center.
It is highly recommended to use full-fat block cream cheese. Low-fat varieties contain higher water content, which can prevent the cheesecake from setting properly and ruin the rich texture.
No, this recipe specifically omits the water bath. Baking at a high temperature without water is what creates the signature dark caramelized crust while keeping the interior creamy.
The top should have a dark amber, almost burnt appearance. When you gently shake the loaf pan, the edges should look set, but the center must have a significant, dramatic jiggle.
Sinking is completely normal and expected for a burnt Basque-style cheesecake! It puffs up dramatically in the oven and falls as it cools, creating its authentic, rustic, dense texture.
The Ultimate Basque-Style Recipe Card
The Ultimate Rustic Loaf Pan Cheesecake (Burnt Basque Style)
Ingredients
Equipment
Method
- Preheat your oven to 400°F (200°C). Crumple a large sheet of parchment paper tightly into a ball, then flatten it and press it deeply into a 9x5-inch (23x13cm) loaf pan. Ensure the paper extends at least 2 inches above the rim.
- In a large mixing bowl, beat the softened cream cheese and granulated sugar on medium speed for 2 to 3 minutes until completely smooth. Scrape down the sides and bottom of the bowl.
- With the mixer running on low speed, add the room-temperature eggs one at a time. Ensure each egg is fully incorporated before adding the next to maintain a smooth emulsion.
- Sift the all-purpose flour and kosher salt over the batter. Pour in the heavy whipping cream and vanilla extract. Mix on low speed just until the batter is homogeneous and silky. Do not overmix.
- Pour the batter into the prepared loaf pan and tap it gently on the counter to release air bubbles. Bake for 35 to 40 minutes until the top is dark amber and caramelized, but the center still has a significant jiggle when gently shaken.
- Remove from the oven and cool completely on a wire rack for at least 2 hours. The cake will sink as it cools. Once at room temperature, chill in the refrigerator for at least 4 hours (preferably overnight) before slicing and serving.
Notes
Tip 2: Do not skip the chilling process; it is essential for achieving the rich, creamy interior.
 4")
Share Your Baking Masterpiece
Bringing this stunning dessert to life is an incredibly rewarding culinary experience. The sight of that dark caramelized crust yielding to a rich, creamy interior is sure to impress anyone lucky enough to get a slice.
If you successfully recreated this authentic, mouth-watering home-cooked masterpiece, we want to see it! Leave a 5-star rating in the recipe card above, and let us know how your bake turned out in the comments below.
Don’t forget to capture a photo of your thick, rustic slice on a simple ceramic plate! Pin your gorgeous photos and save this recipe over on Pinterest so you can easily find it for your next dinner party.